9.1 KiB
Raspberry zero config
SSH over USB
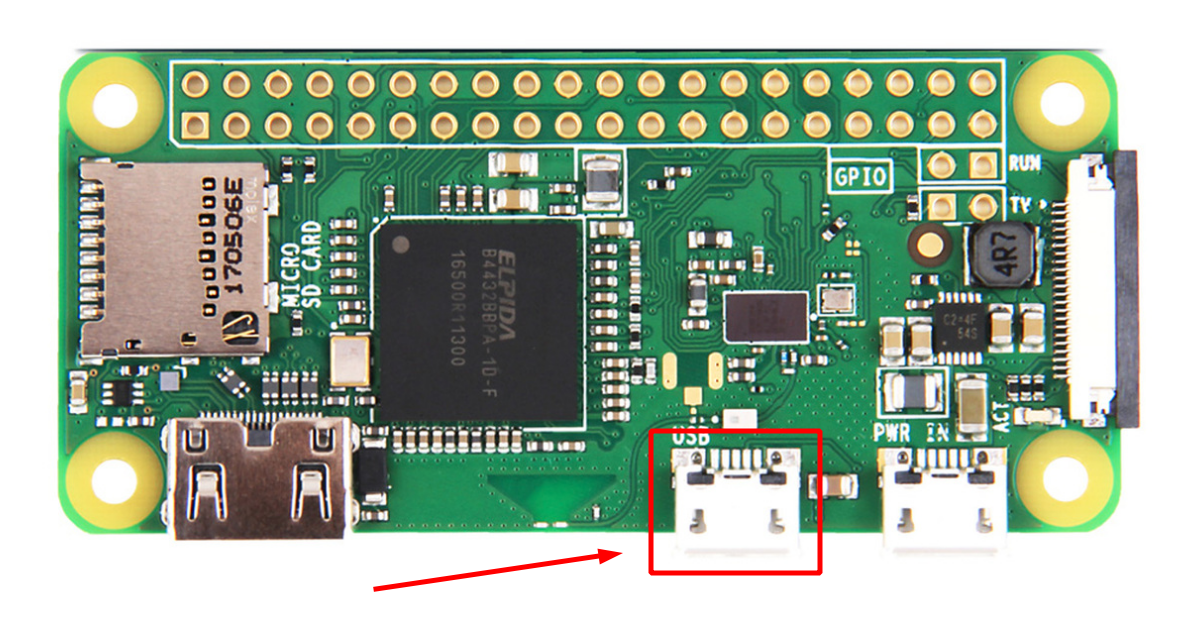
With the micro SD card ready we can now plug the USB cable to our host and Pi Zero. However, note that while the Pi Zero has two micro USB port, only one supports USB On-The-Go (OTG). It is this feature that will allows us to treat the connection as an Ethernet connection. The port in question is the innermost one, the one closer to the center of the board, as shown in the image below.
Set USB Gadget mode
We would like to be able to access the Pi Zero through SSH from our machine using a USB cable. To do that we will have to edit two files.
First, edit the file /config.txt and append this line at the end:
dtoverlay=dwc2
Second, we will edit the file /cmdline.txt. After rootwait, we will add
modules-load=dwc2,g_ether
pay attention to leave only one space between rootwaitand the new text otherwise it might not be parsed correctly.
Note that there might already be some text after rootwait in which case you still must add the following immediately after rootwait! Again, leave a single space after rootwait but also after g_ether.
The Pi Zero is fully configured, we can now configure our host.
Now create an empty file called ssh in the root directory
Configure the Rasp’s Wifi
Another option is just to get your Rasberry Pi to connect your Wi-Fi network, create wpa_supplicant.conf file in the root directory of the SD card memory.
ctrl_interface=DIR=/var/run/wpa_supplicant GROUP=netdev
update_config=1
country=<Insert 2 letter ISO 3166-1 country code here>

network={
 ssid=“<Name of your wireless LAN>”
 psk=“<Password for your wireless LAN>”
}
— My configuration for house:
ctrl_interface=DIR=/var/run/wpa_supplicant GROUP=netdev
update_config=1
country=MX

network={
 ssid=“Haus_2.4G”
 psk=“7476Haus#CB2040$”
}
GL-SFT1200-869 goodlife
— and ping to your Raspberry Pi Zero by:
ping raspzero.local
—
- raspzero
- gmarx
- Pi7476
Pendings:
- Check if the Anavi example use wich package
- Check the HTU21D c example to get access to the raspberryport configuration by executing the
./HTU21doutput file - Upload the precompiled package to configure raspberry
- Take care of the WiringPi package??
- Modify the htu21d example to return a json file to use in the UI
General procedure
- Install packages requirements
- Install/Build WiringPi
- Compile the sensors exacutables
Device preconfiguration
In irdoer to donwload and install gitgub/git packages we need to install the next packages:
sudo apt update
sudo apt upgrade -y
sudo apt install git build-essential
sudo apt install python3-smbus i2c-tools
The next step is no longer require:
- no wpa_supplicant.conf and ssh files require
Enable i2c interface
sudo raspi-config
sudo i2cdetect -y 1
The anavi example
Some code examples for the sensors provided by anavi are located here: GitHub - AnaviTechnology/anavi-examples: Examples for getting started and testing ANAVI Internet of Things and add-on boards HAT & pHAT for Raspberry Pi
However, to use these example for sensors the WiringPi package is required. The package is no loger supported and you need to clone, build, and install it manually.
Wiringpi
https://github.com/WiringPi/WiringPi
short answer:
wrong.
long answer:
wiringPi is not deprecated, it’s just not maintained by G.Henderson any more but still maintained by the community on github.
The last apt package was for Pi3B+/Buster, for Pi4 it’s on github to download:
https://github.com/WiringPi/WiringPi
install:
git clone https://github.com/WiringPi/WiringPi
cd WiringPi
./build debian
ls debian-template/*deb
when you already have an old apt-package and want to upgrade by gitclone, then 1st of all better make a clean uninstall of the old one.
My own header files
This is a detailed guide to configure and create your own files to comunicate with each sensor used by the air-quality sensor.
Enable I2C pheripherical
HTU21D
Header
Create the Header File htu21d.h with Header Guard and Includes:
#ifndef HTU21D_H
#define HTU21D_H

// I2C Address
#define HTU21D_I2C_ADDR 0x40
// Commands
#define HTU21D_TEMP 0xE3
#define HTU21D_HUMID 0xE5
#define HTU21D_RESET 0xFE


// Function declarations:

// Temp
int getTemperature(int fd, double *temperature);
// Humidity
int getHumidity(int fd, double *humidity);

#endif // HTU21D_H
Implement the Sensor Communication htu21d.c
#include <unistd.h> //to send commands to and receive from I2C device
#include <sys/ioctl.h>//setting up and controlling the I2C device settings
#include <linux/i2c-dev.h>//definitions for system calls and structures specific to I2C
#include <i2c/smbus.h>//SMBus commands in a more standardized way for I2C
#include <stdio.h>//perror

#include “htu21d.h” // my own header file

// Reset function:
int reset(int fd)
{
        if(0 > ioctl(fd, I2C_SLAVE, HTU21D_I2C_ADDR))
        {
                perror(“Failed to open the bus”);
                return -1;
        }
        i2c_smbus_write_byte(fd, HTU21D_RESET);
        return 0;
}

// Get temperature:
int getTemperature(int fd, double *temperature)
{
        reset(fd);
        char buf[3];
        __s32 res = i2c_smbus_read_i2c_block_data(fd, HTU21D_TEMP,3,buf);
        if(res<0)
        {
                perror(“Failed to read from the device”);
                return -1;
        }
        *temperature = -46.85 + 175.72 * (buf[0]*256 + buf[1]) / 65536.0;
        return 0;
}


// Get humidity:
int getHumidity(int fd, double *humidity)
{
        reset(fd);
        char buf[3];
        __s32 res = i2c_smbus_read_i2c_block_data(fd, HTU21D_HUMID, 3, buf);
        if(res<0)
        {
                perror(“Failed to read from the device”);
                return -1;
        }
        *humidity = -6 + 125 * (buf[0]*256 + buf[1]) / 65536.0;
        return 0;
}
Using the library
Now let us use the library files to implement an example of its usage(main.c):
#include <stdio.h>
#include <errno.h>
#include <stdlib.h>
#include <string.h>
#include <fcntl.h>

#include “htu21d.h”

int main()
{
        char filename[20];
        snprintf(filename, 19, “/dev/i2c-%d”, 1);
        int fd = open(filename, O_RDWR);
        if (0 > fd)
        {
                fprintf(stderr, “ERROR: Unable to access HTU21D sensor module: %s\n”, strerror (errno));
                exit(-1);
        }

        // Retrieve temperature and humidity
        double temperature = 0;
        double humidity = 0;
        if ( (0 > getHumidity(fd, &humidity)) || (0 > getTemperature(fd, &temperature)) )
        {
                fprintf(stderr, “ERROR: HTU21D sensor module not found\n”);
                exit(-1);
        }

        // Print temperature and humidity on the screen
        printf(“HTU21D Sensor Module\n”);
        printf(“%5.2fC\n”, temperature);
        printf(“%5.2f%%rh\n”, humidity);

        return 0;
}
was missing the stdio.hin htu21d.cimplementaion file
gcc -o example main.c htu21d.c -lbcm2835
htu21d.c: In function ‘reset’:
htu21d.c:13:3: warning: implicit declaration of function ‘perror’ [-Wimplicit-function-declaration]
   13 |   perror(“Failed to open the bus”);
      |   ^~~~~~
htu21d.c: In function ‘getTemperature’:
htu21d.c:21:48: error: expected declaration specifiers before ‘a’
   21 | int getTemperature(int fd, double *temperature)a
      |                                                ^
htu21d.c:38:1: error: expected ‘=‘, ‘,’, ‘;’, ‘asm’ or ‘__attribute__’ before ‘{‘ token
   38 | {
      | ^
htu21d.c:51: error: expected ‘{‘ at end of input
   51 |
      |
Then to properly compile whiout a make file:
gcc -o example main.c htu21d.c -li2c
or
gcc -o example main.c htu21d.c -I. -li2c
Wiring htu21d to Rasp-zero
Htu -> Rasp-Zero VIN -> GPIO 1 GND -> GPIO 9 or (6) SCL -> GPIO 5 SDA -> GPIO 3
BMP180
sudo i2cdetect -y 1
     0  1  2  3  4  5  6  7  8  9  a  b  c  d  e  f
00:                         — — — — — — — —
10: — — — — — — — — — — — — — — — —
20: — — — — — — — — — — — — — — — —
30: — — — — — — — — — — — — — — — —
40: 40 — — — — — — — — — — — — — — —
50: — — — — — — — — — — — — — — — —
60: — — — — — — — — — — — — — — — —
70: — — — — — — — 77
MHZ19
Enable serial iterface
sudo raspi-config
Testing MHZ with python
sudo apt install python3-pip
sudo pip3 install mh-z19
https://chat.openai.com/share/61ea4fa0-29ff-4569-9fdc-36dd4c4c7a30